ISA-Tab
The ISA-Tab file format is built on the ‘Investigation’ (the project context), ‘Study’ (a unit of research) and ‘Assay’ (analytical measurement) metadata categories. The format enables the representation of studies employing one or a combination of technologies, focusing on the description of its experimental metadata.
Data Sharing Procedure
- Create data descriptions in the ISACreator for the submitted data files Download ISACreator from the ISA Tools website Instructions for using ISACreator | General Tutorial for ISACreator (on the ISA-tab website)
- Submit the data to the HDRF data center through Secure FTPYou can use any FTP program with Secure FTP support. Recommended SFTP Clients: Filezilla ( Windows, Mac, Linux) | WinSCP ( Windows only)
Instructions on using SFTP for data submission
Using ISACreator
- Download ISACreator ( download from the ISATools website). (Please check that you are downloading ISACreator, not ISACreator Configurator.)Unzip the downloaded file into a new directory, which we will refer to as the ISACreator directory. Note that this is the directory from which you will run ISACreator.
- Download the configuration settings contained in this zip file, and unzip the downloaded file into the “Configurations” directory under the ISACreator directory.
- Click on “ISAcreator.jar” in the ISACreator directory to start the program, and select the “ISACreator Light” option on start up.The first time you run ISACreator you will need to create a new profile.Select the configuration settings called “isaconfig-hdrf-20140123”.
- Select “create new experiment description” to enter information for a new study, then select “create manually”. Choose a study id, then fill out the relevant fields in the study overview page.
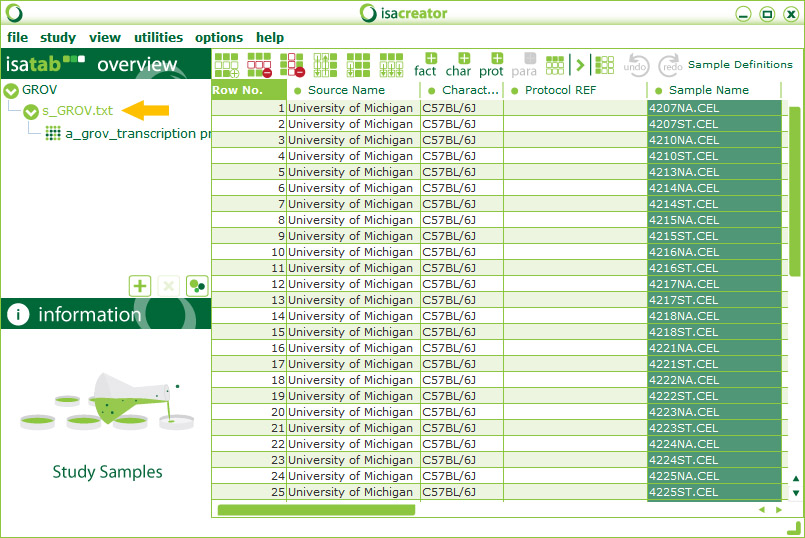
- Enter data about your samples by selecting the sample definitions file named “s_<study_id>.txt” under the study id in the “isatab overview” section.Adding new columns for the sample definitions file is done through the study overview page (design descriptors, factors, protocols)
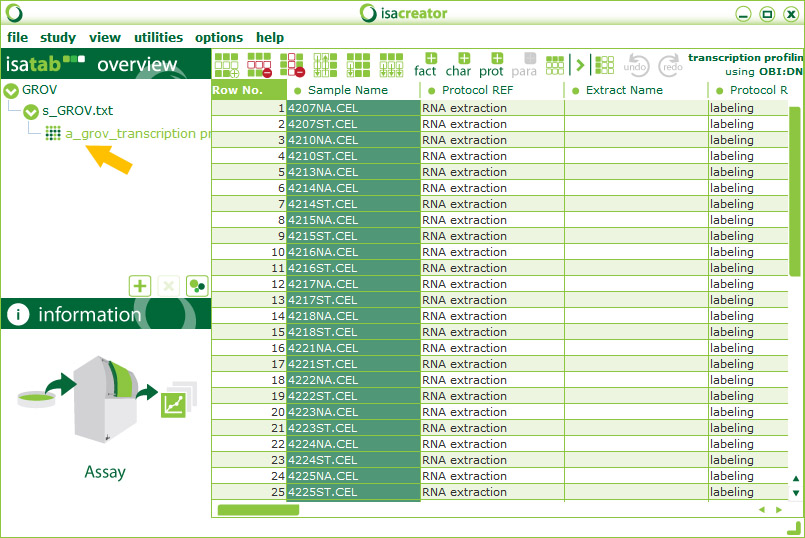
- Connect assay data files to your samples by creating a new assay in the “Study Assays” section of the overview page. This will create a new link in the “isatab overview” section under the sample definitions file which will open the assay description file.Enter information about your assay files, including the file names. There are columns for multiple file types, including image, raw data, and processed data files.Note that the “Sample Name” columns that are found in both the sample definitions file and the assay description file must match exactly for the files to link correctly. See the highlighted columns in the images below (the sample definitions file is top image and the assay description file is the bottom image).
- Save the study by selecting “File”->”Save” from the top menu. If you are saving a new study, you will be prompted for a new directory name.
- For more details on the study overview page and spreadsheet functionality, please see the ISACreator tutorial on the ISA-tools website.
Creating the Data Submission File
- Copy the data files into the directory containing your ISA-tab files. You will find this directory under “isatabs files” under the ISACreator directory.
- Zip your ISA-tab files directory into a file and rename it according to this pattern:
<study_id>_<username>.zip
File Submission using Secure FTP
These instructions are specific to Filezilla ( download from the Filezilla website), but the same connection information can be used with other SFTP clients.
- Install and open the Filezilla client.
- Go to “File” > “Site Manager”.
- Click the “New Site” button and choose a new name for this connection.
- On the right side of the popup window enter or select the following:Host: hdrf-dtf.org
Port: <blank>
Protocol: SFTP – SSH File Transfer Protocol
Logon Type: Normal
User: <HDRF account username>
Password: <HDRF account password> - Click the “Connect” button to connect to the server. (You will start in your personal home directory.)
- Copy the data submission file you created into your home directory on the server.
- Email brainarray(at)umich(dot)edu with the name of the data submission file to inform us that the data is ready to be moved into the repository.
